


Mobile apps have been around for more than a decade now and the mobile app development process has seen a lot of changes owing to the demand that has been generated. In this guide, we will be looking at the steps of the mobile app development process that will improve to build an app with the snap of your fingers.
Globally, the number of mobile device users on the web surpassed the number of users using desktops back in 2017. Even today, nearly half of all Internet activity in the US takes place on mobile devices like smartphones and tablets.
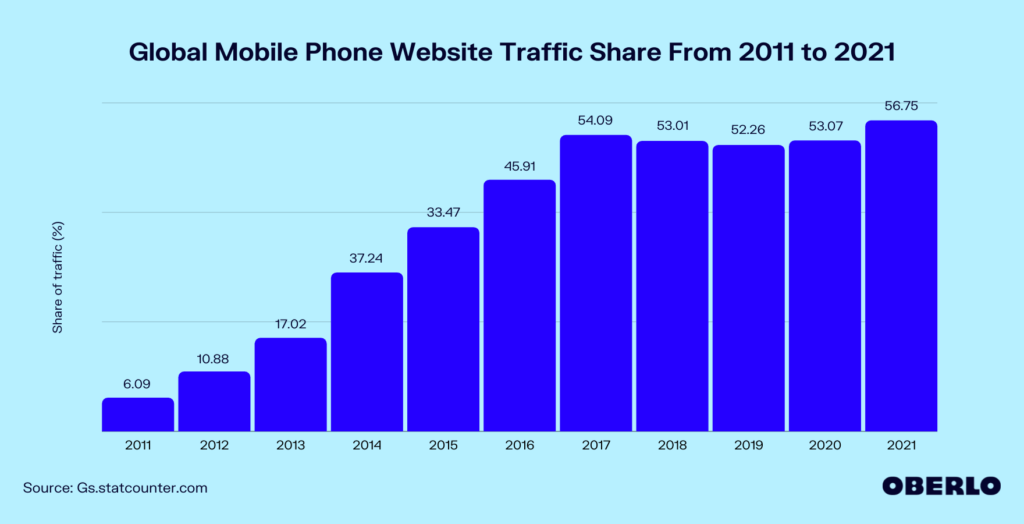

Image Source: Oberlo
The user base of mobile devices has become too enormous to be ignored. Businesses that intend on staying relevant must explore the option of building an application around their products or services.
Businesses that build and market mobile apps to their audiences may even enjoy early adopter benefits in many industries.
Bottom line, building a mobile app development is quickly becoming a necessary undertaking for most businesses.
Unfortunately, most businesses don’t have the in-house expertise required to create their mobile apps. Meaning, such businesses must work with offshore mobile app development companies to turn their dream of a delightful mobile app into reality.
Even when taking the help of an external expert, business owners need to understand the process of app development to be able to collaborate with such a partner effectively.
This is exactly what this guide is about. First, read through our guide to the mobile app development process to understand the different steps involved and their importance.
The Mobile App Development Process
Different teams may employ different iterations of the process that will be discussed in this section. However, in most cases, the steps and sequence are used as a standard industry practice.
Without further delay, let’s begin:
Step 1: Mobile App Development – Planning
Also commonly known as the strategy phase, this is where the objective of the app is explored. While it may seem like a basic step, it is critical. In many cases, the ‘idea’ behind the app seems groundbreaking until the time it is subjected to an intense brainstorming session.
In other words, the first step of the app development process remains the same in 2024, the feasibility of the app idea is verified. Then, if the app idea is truly unique and the objective is clear, more information about the app is determined.
For instance, this is the step when companies must consider what problem their app is solving and how it differs from the other apps available for download right now. It is also a great time to think about the attributes that define the target audience for the application and the incentive that the app will provide to the users to continue using it.
Many of the questions that may arise at this stage may be answered with thorough market research. Moreover, once it has been determined who the app will target and how it will help them, the feature requirements of the application also start becoming apparent.
It is easier to build a development plan, complete with budget estimates and timeline estimates with this knowledge.
Read our post on top aspects to consider when doing Mobile App Development.
Step 2: Defining Requirements And Creating A Roadmap
Once the objective and the intended targeted audience of the application are clear, it is time to create a feature list. It is also a good time to think about other elements of the experience of the application, such as the navigation map, or desired design elements.
Similarly, this is also a good stage to think about the platforms where the application will be made live. Again, if the target audience has been defined properly in the previous step, deciding on the right platform for the application should not be a challenge.
This step is also dedicated to determining the requirements for the actual development of the application. Typically, multiple experts like UI/UX designers and app developers have to collaborate to create an app. Depending on the complexity and scale of the project, one can determine what kind of professionals will make up the development team.
Step 3: The Design Phase


This step is where the application starts taking shape. In this step, the user interface and user experience of the application are designed. This is one of the most important steps of the mobile app development process as the quality of the user experience is almost always a deciding factor in determining the success of any mobile application.
Ideally, the objective here should be to design an interactive, intuitive, and, most importantly, user-friendly application. To ensure the same, the design phase can be further divided into five parts:
-
Information Architecture and Workflows
This is where it is determined how the information within the application will be structured. Meaning, it is decided what data will be displayed to the user on different ‘screens’ of the application. Defining what information will be collected from a user to perform specific actions, such as shopping, is also a part of designing the information architecture and workflows.
If the application is expected to serve different users with different types of roles/privileges, then different information architectures and workflows may be built, suited to different ‘classes’ of users.
-
Mobile App Development Process – Wireframes
User experience and interface designers often start the design of an application by drawing it out on paper. The process of digitizing this paper-based design is known as wireframing, and it is a critical aspect of the app development process. A wireframe is simply the first visual structure of the application.
Creating wireframes should not take long, as the primary focus is on designing an aesthetic and delightful user experience. Colour schemes and styles are not considered at this stage. In other words, a wireframe is the low-fidelity version of the finished application.
-
Style Guide:
As the name suggests, the style guide lays down specific rules regarding the use of different graphic elements within the application. This includes, but may not be limited to, defining the colors, the fonts, and the illustrative elements that will be used in the application’s user interface. The style guide also defines what the menus, the dialogue boxes, the alerts, and other similar elements of the application will look like.
The primary purpose of the user interface style guide is to ensure there is consistency in the design of the application.
-
Mockup Creation:
Once the information architecture has been designed, the wireframe has been readied, and the style guide is written, creating a high-fidelity version of the previously created wireframe is possible.
Creating a mockup allows developers and designers to bring together all the elements that were created, designed, and identified in the previous step. A mockup can be created using tools like Adobe Illustrator, and it provides a preview of the way the actual application will look after development.
-
Prototype Creation:
A prototype is a working model of the mockup. It lets the development team experience what the users will experience once they have downloaded the finished application. The prototype helps developers identify errors in their design before the actual native app development process begins.
While it may seem like an unnecessary step, prototyping helps development teams avoid critical errors that would take a lot of time and money to fix once the coding and development process begins.
Also read our related post on Mobile App Development Outsourcing.
Step 4: Development
This is where the tech stack becomes active and the code for the application is written. As one can expect, this is a crucial step. However, before this step is executed, it is important to define the following:
- The tech stack
- The technology architecture
- The development milestones
Once the above-mentioned details have been defined, it is time to start the development process. Typically, this process involves three steps:
-
Back-End Development:
This part of the development process aims to develop an interface that is integrated with the backend database of the application. The backend is where the user data is stored. While many basic features, like a calculator, don’t require access to a database, it is still an important aspect of the development process for most applications.
-
Application Programming Interface:
The application programming interface or API defines the standards of communication between the front-end protocols and the application’s back-end.
-
Front-End Development:
The front-end is the aggregation of everything that the user sees on their screen while using the application. Therefore, ensuring the front-end and the back-end of the application work together smoothly is the key to ensuring a delightful application experience for the users. With that said, in some cases, where the developers want to enable the users to use the app even when there is not an internet connection available, the front-end should be designed to use the local storage of the device.
Step 5: Testing


Once the development process is finished, it is time to test whether or not the application is working as it was intended to work. Typically, conducting quality assurance testing aims to ensure that the application provides a seamless user experience that is both stable and secure. While there are virtually endless testing scenarios that can be employed, they can be divided into five major categories:
-
User Experience Testing:
This is where the user experience of the application is put to the test. In most cases, a competitor’s application (if one exists) is first presented to the users, and then the client’s application is presented. The objective here is to find missing or optimizable elements in the user experience.
These usually include missing features or a poorly optimized information architecture, but the specific changes vary for different projects. Once the changes have been made, more rounds of tests may be conducted to ensure a truly intuitive user experience.
-
Functional Testing:
Functional testing is not done with the help of the users. Instead, the functionality of a mobile application is tested at the internal system logic level. Traditionally, these tests were done manually, but the advent of AI has enabled development teams to automate the slow and repetitive process. Thanks to the implementation of AI technology, functional testing is more rigorous, more accurate, and quicker than ever before.
-
Performance Testing:
Performance testing ensures that the app continues to function with stability, even when it is subjected to a predefined amount of load. Metrics like responsiveness and speed in executing functions are tracked after putting the application under a workload. Common tests include load testing, spike testing, stress testing, and capacity testing.
Testing mobile application’s robustness & reliability is important or else it may fail at critical times. This can lead to serious repercussions like loss of revenue and turning away regular users.
-
Security Testing:
Ensuring an application is secure is important, even if the application does not deal with payment information. Modern users are incredibly concerned about their privacy. That’s why, for any application to succeed and attract more downloads, providing tight security is one of the important requirements.
Google Playstore and Apple’s App Store even display the kind of security provided by the app in the description section.
-
Platform and OS Testing:
Unlike desktop and laptop monitors, mobile applications have certain requirements. This is because mobile devices come in a variety of sizes and dimensions. Similarly, in the case of mobile devices, new versions of popular operating systems are rolled out quite often.
Android’s case is especially complex since the operating system is open-source; and thus, different manufacturers have customized it to best suit their devices. In other words, mobile applications should adapt to different screen sizes and frequent OS updates. This ensures that all mobile device users can use them without any hassle. This is ensured with the help of platform and OS testing.
Step 6: Deployment
The final step is to submit the finished application to the application store(s). While Google Playstore’s guidelines are relatively liberal, Apple subjects all applications through a rigorous review process. While most Android apps become available on the Play Store in a matter of hours after submission; Apple’s review process usually stretches a few days.
If a professional mobile app development company is developing the app, this step is usually a breeze to execute.
Conclusion
The app development process doesn’t end with deployment. One of the ongoing responsibilities of the developers or owners is to ensure the app continues to operate smoothly. Moreover, most applications receive first feedback after launch, which offers invaluable insights into actual customer expectations based on live data. This feedback, if used smartly, can play a critical role in the success of any application. This is another area where ongoing support from the development team is a necessity.
In other words, to keep the application relevant to users and the current technology capabilities, its continuous support is necessary.
Frequently Asked Questions
What Processes are Involved in Developing a Mobile App?
The steps for creating a mobile app are as follows:
1. Make a note of an idea or an issue
2. Determine the requirement
3. Make a flow chart and a list of features
4. Keep essential features only
5. Prioritise design
6. Engage the services of a designer/developer
7. Create accounts for developers
8. Analytics should be included
9. Get immediate feedback and make adjustments
What are the Five Stages of the App Creation Process?
The following are the five stages/phases of the app development process:
– Strategy
– Design
– Development
– Testing
– Release
How do you make a Mobile App Roadmap?
A product roadmap is a strategic document that outlines the key stages in the development of a product. A good mobile app roadmap must have the below things:
PRODUCT VISION – a description of how you want your final product to appear.
STRATEGY – a plan of action that lays out what you’ll need to meet the requirements.
A GOAL – a specific objective that will be estimated using certain measures.
INITIATIVE – a collection of qualities that must be followed in order to achieve the GOAL.
PRODUCT FEATURES – such as functionality or a third-party app, is referred to as a feature.
TIME FRAME – the length of time (in hours) required to complete a certain goal or feature.
STATUS MARKER – This is a tool for keeping track of a project’s progress.
METRICS – Metrics such as organic traffic and churn rate are used to measure goals.
What Processes are Involved in the Design Phase of a Mobile App?
There are four stages to designing a mobile app:
1. Recognize and understand the company’s strategy.
2. Mobile app development strategy.
3. App marketing strategy.
4. Product management strategy.
What are the Three Steps Involved in Developing an App?
The three steps in the app development process are as follows:
1. Define the specifications
2. Prototyping
3. Developing the application
What are the Five Major Categories of App Development Testing?
Here are five methods of testing you may perform to ensure that modifications to your code function as expected:
– Unit tests are performed.
– Tests for integration.
– Functional evaluations.
– End-to-end tests are performed.
– Acceptance testing takes place.
Social Hashtags
#mobileappdevelopment #mobileappdevelopmentprocess #appdevelopmentprocess #guidetomobileappdevelopment #nativeappdevelopmentprocess #nativeappdevelopmentprocess #appdevelopmentsteps #planning #designing #testing #development #deployment #mobileappdevelopmentcompany #mobileappdevelopmentservices #guide #mobileappdevelopmentguide #appdevelopmentprocessguide
Mobile App Development Process: INFOGRAPHIC

